PowerShell 技能连载 - 列出所有打印任务
适用于 Windows 8.1 或 Server 2012 R2
Windows 8.1 和 Server 2012 R2 引入了一个名为“PrintManagement”的模块。它包含了管理本地和远程打印机所需的所有 cmdlet。
要列出指定计算机的所有打印任务,首先确定可用的打印机,然后用循环取出每个打印机的打印任务。这实际做起来十分简单:
$ComputerName = $env:COMPUTERNAME

Get-Printer -ComputerName $ComputerName |  ForEach-Object {
  Get-PrintJob -PrinterName $_.Name -ComputerName $ComputerName
 }
如果该代码返回空,那么说明没有打印任务(或者您没有读取它们的权限)。
PowerShell 技能连载 - 远程更新组策略
适用于 Windows 8.1 或 Server 2012 R2
要更新远程计算机上的组策略设置,请使用 Invoke-GPUpdate,并且传入希望更新设置的计算机名。
Invoke-GPUpdate 在远程计算机上创建“gpupdate”计划任务。您可以使用 –RandomDelayInMinutes 指定一个 0 至 44640 分钟(31 天)之间的值。该 cmdlet 将使用一个随机的时间因子来避免网络阻塞。
PowerShell 技能连载 - 管理打印机
适用于 Windows 8.1 和 Server 2012 R2
Windows 8.1 和 Server 2012 R2 带来了一个叫做“PrintManagement”的模块。它包含了管理本地和远程打印机所需的所有 Cmdlet。
以下是一个示例脚本,演示了安装打印机驱动、设置打印机端口、安装打印机、共享该打印机,以及设置某些打印机属性的过程。
$ComputerName = $env:COMPUTERNAME

$DriverName = 'Samsung SCX-483x 5x3x Series XPS'
$IPAddress = '192.168.2.107'
$PortName = 'NetworkPrint_192.168.2.107'
$PrinterName = 'BWPrint'
$ShareName = 'Office 12'

Add-PrinterDriver -ComputerName $ComputerName -Name $DriverName
Add-PrinterPort -Name $PortName -ComputerName $ComputerName
Add-Printer -ComputerName $ComputerName -Name $PrinterName -DriverName $DriverName -Shared -ShareName $ShareName -PortName $PortName
Set-PrintConfiguration -ComputerName $ComputerName -PrinterName $PrinterName -PaperSize A4
要使用它,请确保您修改了 $IPAddress 并指向一个存在的打印机。请将 $ComputerName 修改指向一个远程计算机而不是您的本地计算机。
要列出 PrintManagement 模块所带的所有 Cmdlet,请试试以下代码:
PS> Get-Command -Module PrintManagement

CommandType     Name                                               ModuleName
-----------     ----                                               ----------
Function        Add-Printer                                        PrintManagement
Function        Add-PrinterDriver                                  PrintManagement
Function        Add-PrinterPort                                    PrintManagement
Function        Get-PrintConfiguration                             PrintManagement
Function        Get-Printer                                        PrintManagement
Function        Get-PrinterDriver                                  PrintManagement
Function        Get-PrinterPort                                    PrintManagement
Function        Get-PrinterProperty                                PrintManagement
Function        Get-PrintJob                                       PrintManagement
Function        Read-PrinterNfcTag                                 PrintManagement
Function        Remove-Printer                                     PrintManagement
Function        Remove-PrinterDriver                               PrintManagement
Function        Remove-PrinterPort                                 PrintManagement
Function        Remove-PrintJob                                    PrintManagement
Function        Rename-Printer                                     PrintManagement
Function        Restart-PrintJob                                   PrintManagement
Function        Resume-PrintJob                                    PrintManagement
Function        Set-PrintConfiguration                             PrintManagement
Function        Set-Printer                                        PrintManagement
Function        Set-PrinterProperty                                PrintManagement
Function        Suspend-PrintJob                                   PrintManagement
Function        Write-PrinterNfcTag                                PrintManagement
如您所见,它们实际上是 PowerShell 函数而不是二进制 Cmdlet。
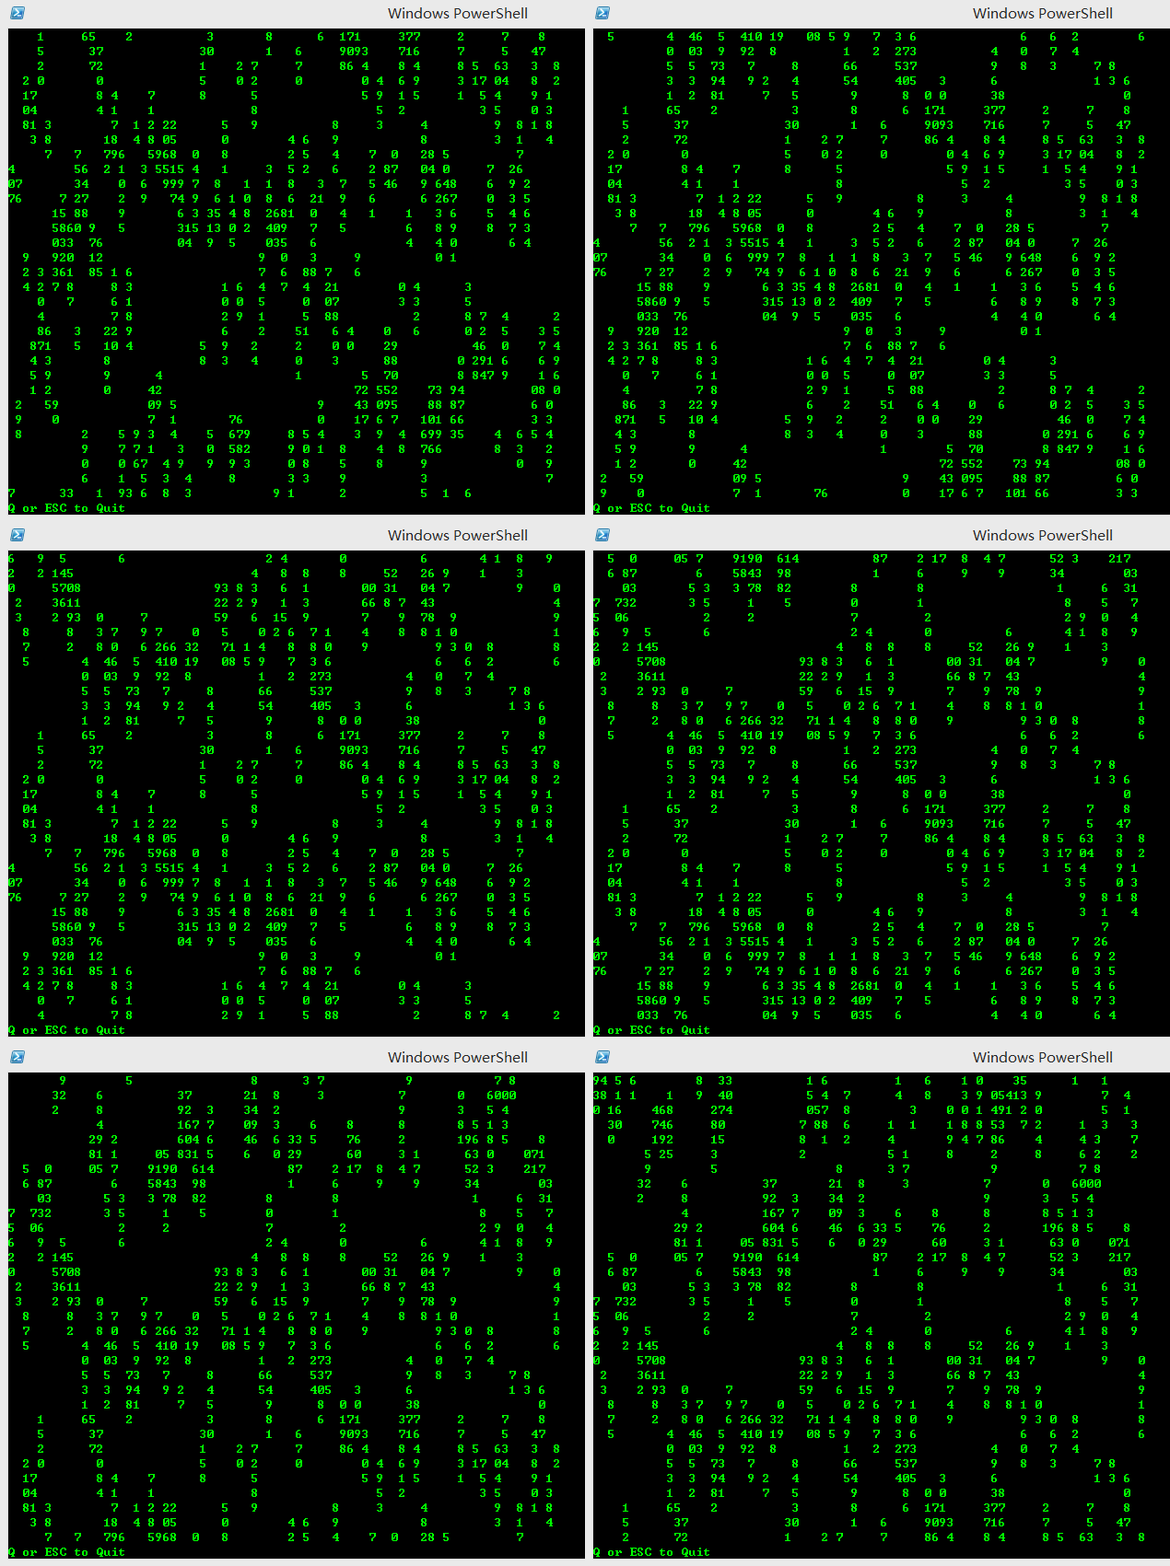
用 PowerShell 显示 黑客帝国数码雨动画
请在 PowerShell 控制台中执行本脚本
今天在群里看到一个数码雨的课题,试着实现了一下:
【话痨】powershell传教士(1328486072) 12:58:11
话说有人用bat写出了数码雨,谁也用powershell写一个,我用powershell写了几个,总感觉不对。
【话痨】powershell传教士(1328486072) 12:58:52
有人对命令行数码雨,感兴趣么?
根据传教士的提示,改了一下,避免了闪烁。
实现效果

源代码
1 | ## Prepare the screen |
您也可以在这里下载 Matrix.ps1
PowerShell 技能连载 - 简化 .NET 类型
适用于 PowerShell 所有版本
PowerShell 为多数常见的 .NET 类型定义了一个短名字。要查看已有多少个 .NET 类型定义了短名称,请使用以下代码:
PS> [System.Management.Automation.LanguagePrimitives]::ConvertTypeNameToPSTypeName("System.String")
[string]

PS> [System.Management.Automation.LanguagePrimitives]::ConvertTypeNameToPSTypeName("System.Int32")
[int]

PS> [System.Management.Automation.LanguagePrimitives]::ConvertTypeNameToPSTypeName("System.Management.ManagementObject")
[wmi]

PS> [System.Management.Automation.LanguagePrimitives]::ConvertTypeNameToPSTypeName("System.DirectoryServices.DirectoryEntry")
[adsi]

PS>
要查用另一种方法看真实的 .NET 名称,请使用以下方法:
PS> [string].FullName
System.String

PS> [int].FullName
System.Int32

PS> [wmi].FullName
System.Management.ManagementObject

PS> [adsi].FullName
System.DirectoryServices.DirectoryEntry

PS>
通过这个技巧,您还可以更好地理解 PowerShell 转换数据类型的机制:
PS> [System.Management.Automation.LanguagePrimitives]::ConvertTypeNameToPSTypeName("UInt8")
[Byte]

PS>
这表明了,当 PowerShell 遇到一个无符号 8 位整型数值,将自动把它转换为一个 Byte 数据。整个魔法是由 ConvertTypeNameToPSTypeName() 完成的。在内部,PowerShell 使用一个检索表来转换特定的数据类型:
$field = [System.Management.Automation.LanguagePrimitives].GetField('nameMap', 'NonPublic,Static')
$field.GetValue([System.Management.Automation.LanguagePrimitives])
该检索表看起来类似这样:
Key                                                            Value
---                                                            -----
SInt8                                                          SByte
UInt8                                                          Byte
SInt16                                                         Int16
UInt16                                                         UInt16
SInt32                                                         Int32
UInt32                                                         UInt32
SInt64                                                         Int64
UInt64                                                         UInt64
Real32                                                         Single
Real64                                                         double
Boolean                                                        bool
String                                                         string
DateTime                                                       DateTime
Reference                                                      CimInstance
Char16                                                         char
Instance                                                       CimInstance
BooleanArray                                                   bool[]
UInt8Array                                                     byte[]
SInt8Array                                                     Sbyte[]
UInt16Array                                                    uint16[]
SInt16Array                                                    int64[]
UInt32Array                                                    UInt32[]
SInt32Array                                                    Int32[]
UInt64Array                                                    UInt64[]
SInt64Array                                                    Int64[]
Real32Array                                                    Single[]
Real64Array                                                    double[]
Char16Array                                                    char[]
DateTimeArray                                                  DateTime[]
StringArray                                                    string[]
ReferenceArray                                                 CimInstance[]
InstanceArray                                                  CimInstance[]
Unknown                                                        UnknownType
PowerShell 技能连载 - 将代码转为大写
适用于 PowerShell 3.0 及以上版本
在 PowerShell ISE 中要将 PowerShell 的代码转为全大写,请选中文本,并按下 CTRL + SHIFT + U。
To turn text to all lowercase letters, press CTRL+U.
要将文本转为全小写,请按 CTRL+U。
PowerShell 技能连载 - 映射驱动器
适用于 PowerShell 3.0 及以上版本
要永久地映射一个网络驱动器,请使用 New-PSDrive 加上 -Persist 参数。这个参数使得驱动器在 PowerShell 之外可见。
要真正地创建一个永久的网络驱动器,请确保加上 -Scope Global。如果 New-PSDrive 在全局作用域范围之外运行(例如,在一个脚本中运行),该驱动器只会在脚本运行时出现在文件管理器中。
这个实例代码演示了如何映射一个网络驱动器:
New-PSDrive -Name k -PSProvider FileSystem -Root \\storage2\vid -Persist -Scope Global
PowerShell 技能连载 - 在输出中使用系统的错误颜色
适用于 PowerShell 所有版本
如果您的脚本希望输出警告或错误信息,您可以使用 Write-Warning 或 Write-Error 指令。两个 cmdlet 都会使用缺省的 PowerShell 颜色来显示警告和错误。然而,这两个 cmdlet 也会为您的输出结果套用一个文字模板:
PS> Write-Warning -Message 'This  is a warning'
WARNING: This is a warning

PS> Write-Error -Message  'Something went wrong'
Write-Error -Message 'Something went wrong'  : Something went wrong
    +  CategoryInfo          : NotSpecified: (:)  [Write-Error], WriteErrorException
    +  FullyQualifiedErrorId : Microsoft.PowerShell.Commands.WriteErrorException
Write-Error 添加了一堆无意义的异常详细信息,而您所需要的只是错误文本。一个更好的方式是:
PS>  $host.UI.WriteErrorLine('Something went wrong...')
Something went wrong...
警告和错误的颜色可以通过这种方式配置:
PS>  $host.UI.WriteErrorLine('Something went wrong...')
Something went wrong...

PS> $host.PrivateData.ErrorBackgroundColor  = 'White'

PS>  $host.UI.WriteErrorLine('Something went wrong...')
Something  went wrong...

PS> $host.PrivateData

(...)
ErrorForegroundColor                      : #FFFF0000
ErrorBackgroundColor                      : #FFFFFFFF
WarningForegroundColor                    : #FFFF8C00
WarningBackgroundColor                    : #00FFFFFF
VerboseForegroundColor                    : #FF00FFFF
VerboseBackgroundColor                    : #00FFFFFF
DebugForegroundColor                      : #FF00FFFF
DebugBackgroundColor                      : #00FFFFFF
(...)