Drone Resources
DJI 大疆
- DJI Developer DJI PC Simulator Installer & User Manual
- 【新手必看】DJI 官方教程、网友经验分享合集(更新于11.22)
从看过的电影、美剧里学英语是一件很棒的事。因为你曾经被带入过那个场景,曾经和主角一同喜怒哀乐。如果能将电影里的中英文对白整理出来,对做笔记和搜索回顾将大有帮助。
我们可以从网上(例如射手网)下载视频的中英文字幕,需要是 .srt 格式的。它实际上是一个文本文件,内容类似如下:
1 | 13 |
我们希望将它整理成这样的格式:
1 | 第三季 第一集 |
这个任务可以用 PowerShell + 正则表达式轻松搞定。
1 | if (!(Test-Path dst)) { |
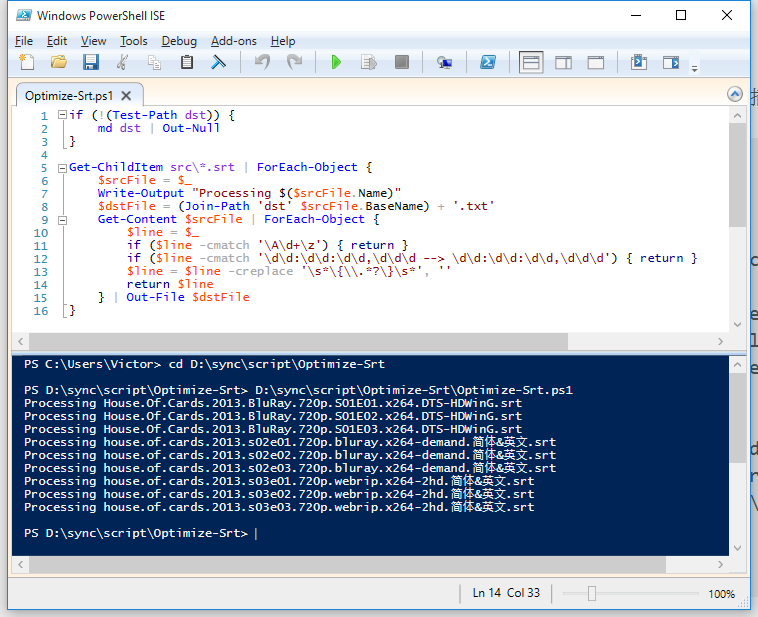
只需要将字幕源文件放在_src_目录下,运行脚本,就可以在_dst_目录下得到期望的文本文件。执行效果如下:

文件目录如下:
您也可以在这里下载完整的脚本。
请在 PowerShell 控制台中执行本脚本
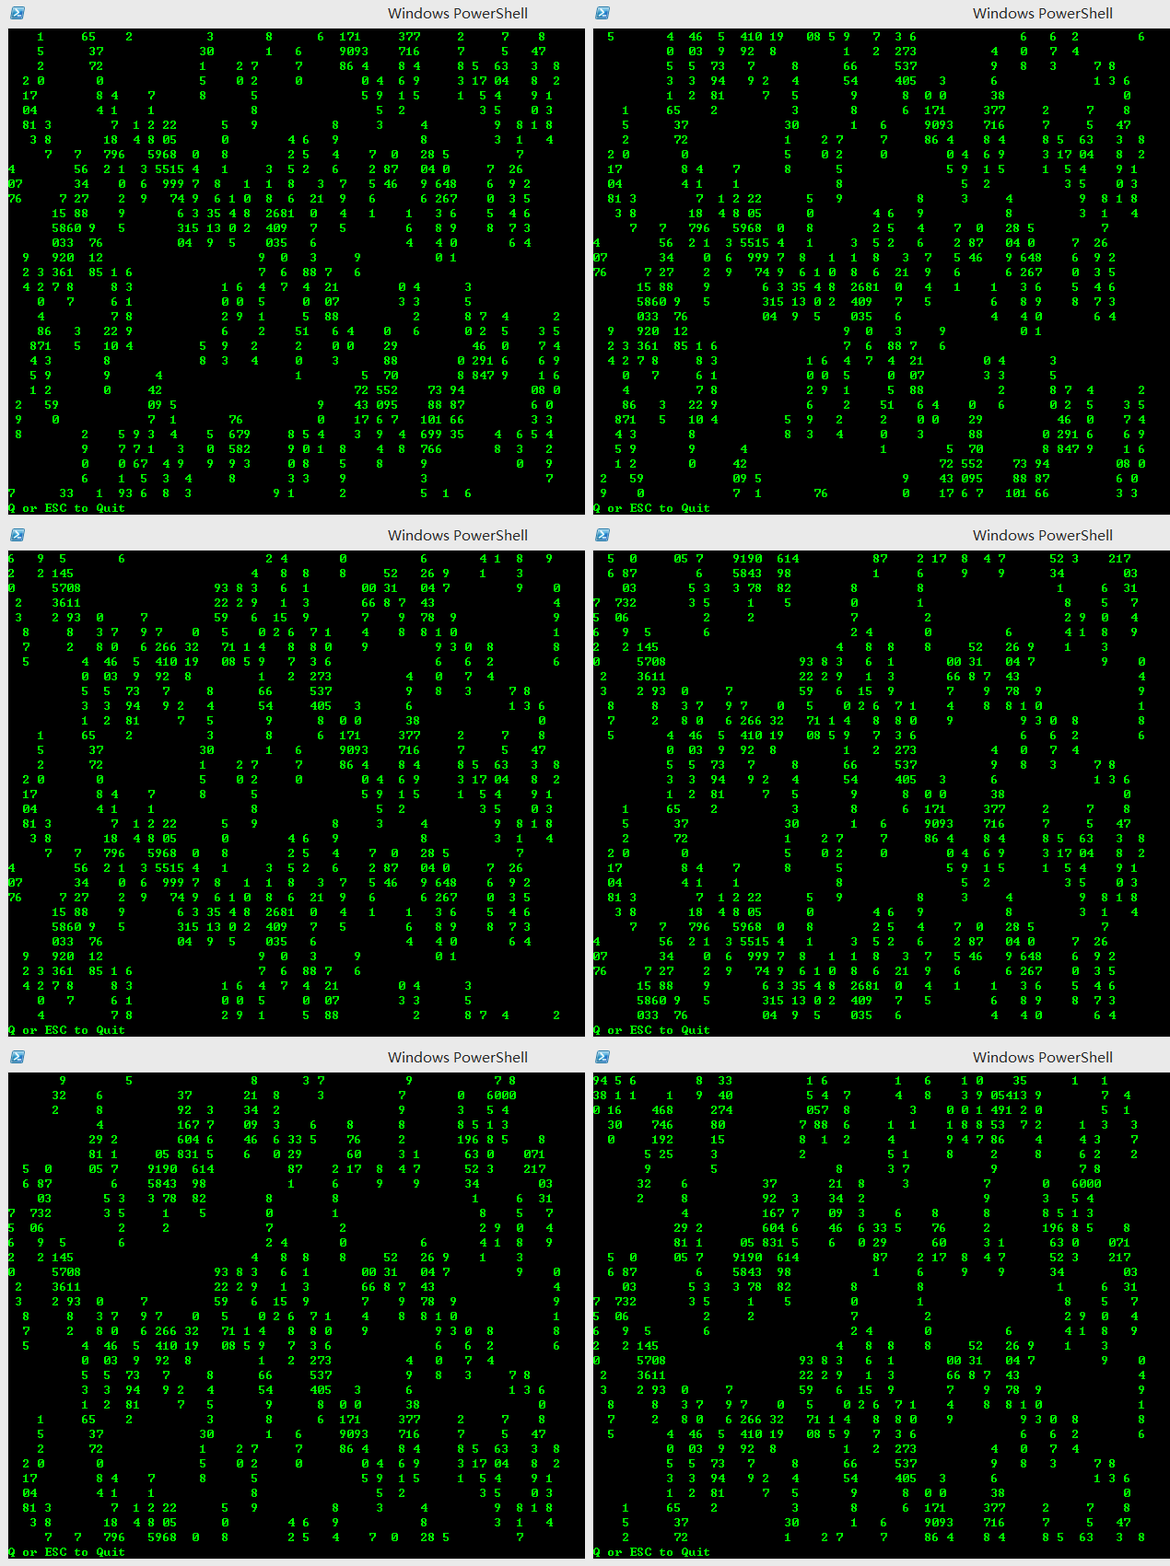
今天在群里看到一个数码雨的课题,试着实现了一下:
【话痨】powershell传教士(1328486072) 12:58:11
话说有人用bat写出了数码雨,谁也用powershell写一个,我用powershell写了几个,总感觉不对。
【话痨】powershell传教士(1328486072) 12:58:52
有人对命令行数码雨,感兴趣么?
根据传教士的提示,改了一下,避免了闪烁。

1 | ## Prepare the screen |
您也可以在这里下载 Matrix.ps1
网页版百度云盘一次性只能选取 100 个文件。如果我要对 500 个文件做批量操作就很困难了。
这时候我们可以在浏览器的地址栏内敲入这行代码,就自动帮您勾选前 100 个文件(夹)了:
javascript:$("span[node-type='chk']:lt(101)").addClass("chked")
这是一个从 http://www.imooc.com 教学网站批量下载视频的 PowerShell 脚本。默认下载的是最高清晰度的视频。
您可以传入课程专辑的 URL 作为下载参数:
.\Download-Imooc.ps1 http://www.imooc.com/learn/197
可以一口气传入多个课程专辑的 ID 作为参数:
.\Download-Imooc.ps1 75,197
如果不传任何参数的话,将在当前文件夹中搜索已下载的课程,并自动续传。
.\Download-Imooc.ps1
如果希望自动合并所有视频,请使用 -Combine 参数。该参数可以和其它参数同时使用。
.\Download-Imooc.ps1 -Combine
代码中用到了参数分组、-WhatIf 处理等技术,供参考。
以下是源代码:
# Require PowerShell 3.0 or higher.

[CmdletBinding(DefaultParameterSetName='URI', SupportsShouldProcess=$true, ConfirmImpact='Medium')]
Param
(
    [Parameter(ParameterSetName='URI',Position = 0)]
    [string]
    $Uri, # 'http://www.imooc.com/learn/197'

    [Parameter(ParameterSetName='ID', Position = 0)]
    [int[]]
    $ID, # @(75, 197)

    [Switch]
    $Combine, # = $true

    [Switch]
    $RemoveOriginal
)

# $DebugPreference = 'Continue' # Continue, SilentlyContinue
# $WhatIfPreference = $true # $true, $false

# 修正文件名,将文件系统不支持的字符替换成“.”
function Fix-FileName {
    Param (
        $FileName
    )

    [System.IO.Path]::GetInvalidFileNameChars() | ForEach-Object {
        $FileName = $FileName.Replace($_, '.')
    }

    return $FileName
}

# 修正目录名,将文件系统不支持的字符替换成“.”
function Fix-FolderName {
    Param (
        $FolderName
    )

    [System.IO.Path]::GetInvalidPathChars() | ForEach-Object {
        $FolderName = $FolderName.Replace($_, '.')
    }

    return $FolderName
}

# 从专辑页面中分析标题和视频页面的 ID。
function Get-ID {
    Param (
        $Uri
    )

    $Uri = $Uri.Replace('/view/', '/learn/')
    $Uri = $Uri.Replace('/qa/', '/learn/')
    $Uri = $Uri.Replace('/note/', '/learn/')
    $Uri = $Uri.Replace('/wiki/', '/learn/')
    $response = Invoke-WebRequest $Uri
    $title = $response.ParsedHtml.title

    echo $title
    $links = $response.Links
    $links | ForEach-Object {
        if ($_.href -cmatch '(?m)^/video/(\d+)$') {
            return [PSCustomObject][Ordered]@{
                Title = $_.InnerText;
                ID = $Matches[1]
            }
        }
    }
}

# 获取视频下载地址。
function Get-VideoUri {
    Param (
        [Parameter(ValueFromPipeline=$true)]
        $ID
    )

    $template = 'http://www.imooc.com/course/ajaxmediainfo/?mid={0}&mode=flash'
    $uri = $template -f $ID
    Write-Debug $uri
    $result = Invoke-RestMethod $uri
    if ($result.result -ne 0) {
        Write-Warning $result.result
    }

    $uri = $result.data.result.mpath.'0'

    # 取最高清晰度的版本。
    $uri = $uri.Replace('L.flv', 'H.flv').Replace('M.flv', 'H.flv')
    return $uri
}

# 创建“.url”快捷方式。
function New-ShortCut {
    Param (
        $Title,
        $Uri
    )

    $shell = New-Object -ComObject 'wscript.shell'
    $dir = pwd
    $path = Join-Path $dir "$Title\$Title.url"
    $lnk = $shell.CreateShortcut($path)
    $lnk.TargetPath = $Uri
    $lnk.Save()
}

function Assert-PSVersion {
    if (($PSVersionTable.PSCompatibleVersions | Where-Object Major -ge 3).Count -eq 0) {
        Write-Error '请安装 PowerShell 3.0 以上的版本。'
        exit
    }
}

function Get-ExistingCourses {
    Get-ChildItem -Directory | ForEach-Object {
        $folder = $_
        $expectedFilePath = (Join-Path $folder $folder.Name) + '.url'
        if (Test-Path -PathType Leaf $expectedFilePath) {
            $shell = New-Object -ComObject 'wscript.shell'
            $lnk = $shell.CreateShortcut($expectedFilePath)
            $targetPath = $lnk.TargetPath
            if ($targetPath -cmatch '(?m)\A^http://www\.imooc\.com/\w+/\d+$\z') {
                echo $targetPath
            }
        }
    }
}

# 下载课程。
function Download-Course {
    Param (
        [string]$Uri
    )

    Write-Progress -Activity '下载视频' -Status '分析视频 ID'
    $title, $ids = Get-ID -Uri $Uri
    Write-Output "课程名称:$title"
    Write-Debug $title
    $folderName = Fix-FolderName $title
    Write-Debug $folderName
    if (-not (Test-Path $folderName)) { $null = mkdir $folderName }
    New-ShortCut -Title $title -Uri $Uri

    $outputPathes = New-Object System.Collections.ArrayList
    $actualDownloadAny = $false
    #$ids = $ids | Select-Object -First 3
    $ids | ForEach-Object {
        if ($_.Title -cnotmatch '(?m)^\d') {
            return
        }

        $title = $_.Title
        Write-Progress -Activity '下载视频' -Status '获取视频地址'
        $videoUrl = Get-VideoUri $_.ID
        $extension = ($videoUrl -split '\.')[-1]

        $title = Fix-FileName $title
        $outputPath = "$folderName\$title.$extension"
        $null = $outputPathes.Add($outputPath)
        Write-Output $title
        Write-Debug $videoUrl
        Write-Debug $outputPath

        if (Test-Path $outputPath) {
            Write-Debug "目标文件 $outputPath 已存在,自动跳过"
        } else {
            Write-Progress -Activity '下载视频' -Status "下载《$title》视频文件"
            if ($PSCmdlet.ShouldProcess("$videoUrl", 'Invoke-WebRequest')) {
                Invoke-WebRequest -Uri $videoUrl -OutFile $outputPath
                $actualDownloadAny = $true
            }
        }
    }

    $targetFile = "$folderName\$folderName.flv"
    #if ($Combine -and ($actualDownloadAny -or -not (Test-Path $targetFile))) {
    if ($Combine) {
        # -and ($actualDownloadAny -or -not (Test-Path $targetFile))) {
        if ($actualDownloadAny -or -not (Test-Path $targetFile) -or (Test-Path $targetFile) -and $PSCmdlet.ShouldProcess('分段视频', '合并')) {
            Write-Progress -Activity '下载视频' -Status '合并视频'
            Write-Output ("合并视频(共 {0:N0} 个)" -f $outputPathes.Count)
            $outputPathes.Insert(0, $targetFile)

            $eap = $ErrorActionPreference
            $ErrorActionPreference = "SilentlyContinue"
            .\FlvBind.exe $outputPathes.ToArray()
            $ErrorActionPreference = $eap

            <#
            $outputPathes = $outputPathes | ForEach-Object {
                "`"$_`""
            }
            Start-Process `
                -WorkingDirectory (pwd) `
                -FilePath .\FlvBind.exe `
                -ArgumentList $outputPathes `
                -NoNewWindow `
                -Wait `
                -ErrorAction SilentlyContinue `
                -WindowStyle Hidden
            #>
            if ($?) {
                Write-Output '视频合并成功'
                if ($RemoveOriginal -and $PSCmdlet.ShouldProcess('分段视频', '删除')) {
                    $outputPathes.RemoveAt(0)
                    $outputPathes | ForEach-Object {
                        Remove-Item $_
                    }
                    Write-Output '原始视频删除完毕'
                }
            } else {
                Write-Warning '视频合并失败'
            }
        }
    }
}

Assert-PSVersion

# 判断参数集
$chosen= $PSCmdlet.ParameterSetName
if ($chosen -eq 'URI') {
    if ($Uri) {
        Download-Course $Uri
    } else {
        Get-ExistingCourses | ForEach-Object {
            Download-Course $_
        }
    }
}
if ($chosen -eq 'ID') {
    $template = 'http://www.imooc.com/learn/{0}'
    $ID | ForEach-Object {
        $Uri = $template -f $_
        Download-Course $Uri
    }
}
您也可以从这里下载完整的代码。
有 PowerShell 在手,进行 URI 转义、反转义这点小事就不需要找别的工具了。
# 对 URI 进行转义
[System.Uri]::EscapeUriString('http://www.baidu.com/s?ie=UTF-8&wd=中文')
# http://www.baidu.com/s?ie=UTF-8&wd=%E4%B8%AD%E6%96%87

# 对数据进行转义
[System.Uri]::EscapeDataString('http://www.baidu.com/s?ie=UTF-8&wd=中文')
# http%3A%2F%2Fwww.baidu.com%2Fs%3Fie%3DUTF-8%26wd%3D%E4%B8%AD%E6%96%87

# 对 HEX 数据进行反转义
[System.Uri]::UnescapeDataString('http://www.baidu.com/s?ie=UTF-8&wd=%E4%B8%AD%E6%96%87')
# http://www.baidu.com/s?ie=UTF-8&wd=中文
公网 IP 地址 + 80 端口是稀缺资源。在开发、测试阶段,我们常常需要在一个公网 IP 的 80 端口上,绑定多个 WEB 服务,这些服务可能部署在内网的多台异构服务器上(不同操作系统、不同服务器软件)。
用表格来表达就是:
| 外网访问 | 重定向到 |
|---|---|
| http://home.test.com | http://127.0.0.1:81 |
| http://img.test.com | http://127.0.0.1:82 |
| http://js.test.com | http://127.0.0.1:83 |
在 Linux 下,可以通过 vhost 程序来实现这个需求。在 Windows 下,我们有 XAMPP 和 IIS 两种选择。本文重点介绍 XAMPP 的实现方式。
可以采用这些小工具快速创建测试服务器:
首先要让 3 个域名都指向本机。我们可以直接修改本地 hosts 文件以便测试。这种方式立刻生效,免去申请域名的麻烦。
用提升权限的记事本打开 %windir%\system32\drivers\etc\hosts 文件,加入这段:
127.0.0.1 home.test.com
127.0.0.1 img.test.com
127.0.0.1 js.test.com
这里有个快捷的方法,参见:PowerShell 技能连载 - 编辑“hosts”文件。
请参见 XAMPP 学习路线。只需要其中的 Apache 模块即可。确保 XAMPP 能够正常启动,并能够通过 http://127.0.0.1 访问缺省页面。
编辑 xampp\apache\conf\httpd.conf,将 LoadModule proxy_http_module modules/mod_proxy_http.so 前的 # 号去掉。
编辑 xampp\apache\conf\extra\httpd-vhosts.conf,在尾部添加:
ProxyRequests Off

<Proxy *>
    Order deny,allow
    Allow from all
</Proxy>

<VirtualHost *:80>
    ServerName blog.test.com
    ProxyPass / http://127.0.0.1:81/
    ProxyPassReverse / http://127.0.0.1:81/
</VirtualHost>

<VirtualHost *:80>
    ServerName img.test.com
    ProxyPass / http://127.0.0.1:82/
    ProxyPassReverse / http://127.0.0.1:82/
</VirtualHost>

<VirtualHost *:80>
    ServerName js.test.com
    ProxyPass / http://127.0.0.1:83/
    ProxyPassReverse / http://127.0.0.1:83/
</VirtualHost>
重启 XAMPP 中的 Apache 组件
用 IIS 也可以实现相同的功能。
注意有个坑:
用 %windir%\System32\inetsrv\iis.msc 或通过“这台电脑 - 右键 - 计算机管理” 启动 IIS 管理器,可能看不到 ARR 组件而通过 %windir%\system32\inetsrv\InetMgr.exe 则可以看到。
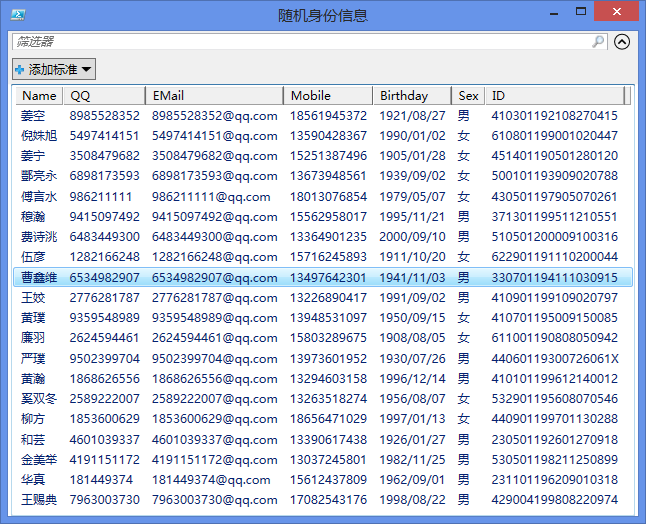
在开发、运维等工作中,我们常常需要生成一些随机的身份信息,例如“张三”、“李四”……等。实际中不光需要姓名,最好还有邮箱、QQ、联系电话、身份证号等。我们可以一劳永逸地写一个 PowerShell 脚本,随时优雅地生成一大串随机身份信息,取之不尽用之不竭。使用效果如下(当然也可以用 Export-Csv 轻松导出到 Excel 或者用 ConvertTo-Html 生成网页):

根据 *PowerShell 技术交流 QQ 群今天的讨论,以及 shrekz 的 powershell 生成随机用户信息,我做了一些改进。增加了生日、性别、身份证号等。设计要点如下:
以下是一个可重用的模块 Get-Identity.psm1,可以把它保存在 %PSModulePath% 目录中,随时调用:
$firstNames = (@'
赵钱孙李周吴郑王冯陈褚卫蒋沈韩杨朱秦尤许何吕施张孔曹严华金魏陶姜戚谢邹喻柏水窦章
云苏潘葛奚范彭郎鲁韦昌马苗凤花方俞任袁柳酆鲍史唐费廉岑薛雷贺倪汤滕殷罗毕郝邬安常
乐于时傅皮卞齐康伍余元卜顾孟平黄和穆萧尹
'@.Split(("`n", "`r")) -join $null).ToCharArray()

$secondNames = (@'
一丁三专世业丝中丰临丹丽举乃义乐乔书云亘亮人仁今仙令仪伟伯伶佑作佩佳侠侬俊俏俐信
修倩健偲儿允元兆光兰兴其典军冠冬冰凌凝凡凯刚初利力勃勇勋化北千卉华卓博卫卿厚原友
双发叡可叶司合吉同名向君吟听启周和咏咸品哲唱善喆喜嗣嘉囡国圣坚基堂墨壁夏多天奇奕
奥好如妃妍妙妞妮姗姝姣娅娇娜娟娥娴婉婧婵婷媚媛嫒嫔嫚子存孟季学宁宇安宜宝实宣宵家
宸容宾密寒寰寻寿小尘尚尹展山岑岚峯峰峻巍州工巧布帅帆希干平年广庆康庸延建弘强弼彤
彦彩彬彭影微德心志忠念忻怀思怡恩恬恺悟悦情惜惠愉意慈慕慧懋懿成才扬承抒拔振捷掣敏
教文斌斯新方施旎旭旻昂昊昌明易昕星春昶晋晓晔晖晤晨景晴晶智暄暖暮曜曦曲曼曾月朋朔
朗望朝木本朵杉杏材杰松林枝枫柏柔柳栋树格桃桐梅梓梦棠森楚楠欢欣歆歌正武毅民水永江
池沈沉沙沛河泉波泰泽洁洛津洮洲流济浓浦浩海涉涛润涵淑淳淼清渊温湃湉湘源溥溪滢滨漪
漫澄澍澹濮濯瀚灵灿炎炳烁烨焕焱然煜煦熙熠燕爽牧献玄玉玑玛玟玲珉珊珍珑珠珺琅琇琛琦
琨琪琲琳琴琼瑜瑞瑶瑾璇璞瓃甜用甫田甲男画畅略白皎益盼真睿知石碧磊礼祖祥祯祺禄福禧
禾秀秉秋程穆空立章童端竹笑笛筠简箫籁米精素红纬纳纵纶经绢绣绮维罗罡美羡羽翎翔翠翮
翰翼耀聪胜能自致舒舟航良艳艺艾芃芊芝芦芬花芳芸苑苗若英茂范茉茗茜茵荌荣荫莉莎莘莲
莹菁菊菡菱菲萌萍萝萧萱蒙蓉蓓蓝蔓蔚蕊蕙蕴蕾薄薇藉藻虎虹蝶行衣裕西言誉许识诗诚语诺
谊谧谷豪贝贞贤资赋赐赡赫超越跃路轩载辉辰达迈运进远迪逸邈邵郁郎采金鑫铃铄锋锐锦长
闲闵阳阵陶隽雄雅雨雪雯雰霁霓霖霞露青靓靖静韦音韵韶顺颀颖颜飇风飙飞香馨驰驹骄高魁
魄鲲鲸鸣鸾鸿鹍鹏麦默黛齐龙
'@.Split(("`n", "`r")) -join $null).ToCharArray()

$mobilePrefixes = @'
134 135 136 137 138 139 147 150 151 152 157 158 159 182 187 188 147 157 188
130 131 132 155 156 185 186 186 133 153 180 189 189 200 133 150 151 152 153
155 156 157 158 159 130 131 132 133 134 135 136 137 138 139 180 182 185 186
187 188 189 170
'@.Split(("`n", "`r", " "), 'RemoveEmptyEntries')

$cityCodes = @'
410701 341101 130901 130601 331001 230501 370601 659001 450301 120221 620701
341001 210201 510101 130501 320901 520401 510701 623001 450401 650201 420901
360701 620401 510501 542521 620501 232701 530401 611001 340401 321301 520101
320401 430501 653101 460101 220301 640201 610801 440501 450701 533421 429004
522401 532901 532801 130101 652101 445301 320601 410301 140201 530501 632121
511301 210501 152921 140901 330701 410101 350501 621101 350901 652801 652201
210801 440801 341801 500101 371401 411301 341501 141101 371301 440301 522201
231101 510901 330601 450201 350301 150201 220101 440901 411601 371101 320101
632221 330301 622901 130201 140101 131001 430301 610701 640101 450801 360601
131101 650101 440101 210301 632801 360401 231001 320801 530601 610201 210701
632321 360501 440201 512001 542621 370901 320201 220501 230801 220401 110228
430401 451201 340701 542301 130401 360201 410901 620601 150301 150801 140401
451001 532501 370101 440601 321001 411701 321101 654002 451401 410501 220801
350401 330201 522301 130701 420301 445101 420701 421301 211201 511701 420601
'@.Split(("`n", "`r", " "), 'RemoveEmptyEntries')

function Get-RandomName {
    return ($firstNames|Get-Random) +
    (($secondNames|Get-Random -Count ((1,2)|Get-Random)) -join $null)
}

function Get-RandomQQ {
    return [string](Get-Random -Minimum 100000 -Maximum 9999999999)
}

function Get-RandomEMail ($QQ) {
    if ($QQ) {
        return "$QQ@qq.com"
    } else {
        return (Get-RandomQQ) + '@qq.com'
    }
}

function Get-RandomMobile {
    return ($mobilePrefixes | Get-Random) +
    ((0..9 | Get-Random -count 8) -join $null)
}

function Get-RandomSex {
    return ('男', '女' | Get-Random)
}

function Get-RandomBirthday {
    return (Get-Date).AddDays(-(Get-Random -Maximum (365 * 110))).Date
}

function Get-RandomID  ([DateTime]$Birthday, $Sex){
    $cityCode = $cityCodes | Get-Random
    #$cityCode = (0..9 | Get-Random -Count 6) -join $null

    if (!$Birthday) {
        $Birthday = Get-RandomBirthday

    }
    $birthdayCode = '{0:yyyyMMdd}' -f $Birthday

    if ($Sex -eq '男' -or $Sex -eq $true) {
        $seq = (Get-Random -Minimum 0 -Maximum 49) * 2 + 1
    } else {
        $seq = (Get-Random -Minimum 0 -Maximum 49) * 2 + 2
    }

    $result = '{0}{1}{2:D3}' -f $cityCode, $birthdayCode, $seq
    $w = @(7, 9, 10, 5, 8, 4, 2, 1, 6, 3, 7, 9, 10, 5, 8, 4, 2)
    $total = 0
    for ($i = 0; $i -lt 17; $i++) {
        $total += $w[$i] * [int]::parse($result[$i])
    }
    $checkCode = [string]($total % 11)
    $checkCode = '10X98765432'[$checkCode]

    $result = $result + $checkCode
    return $result
}

function Get-RandomIdentity {
    $qq = Get-RandomQQ
    $birthday = Get-RandomBirthday
    $sex = Get-RandomSex
    return [pscustomobject][ordered]@{
        Name = Get-RandomName;
        QQ = $qq;
        EMail = Get-RandomEMail -QQ $qq;
        Mobile = Get-RandomMobile;
        Birthday = '{0:yyyy/MM/dd}' -f $birthday
        Sex = $sex
        ID = Get-RandomID -Birthday $birthday -Sex $sex
    }
}

Export-ModuleMember *
测试代码 Test-GetIdentity.ps1:
if (Get-Module Get-Identity) { Remove-Module Get-Identity }
Import-Module .\Get-Identity.psm1

Get-RandomName # 生成随机的姓名
Get-RandomQQ # 生成随机的 QQ 号
Get-RandomEMail # 生成随机的 e-mail
Get-RandomMobile # 生成随机的手机号
'{0:yyyy/MM/dd}' -f (Get-RandomBirthday) # 生成随机的生日
Get-RandomSex # 生成随机的性别
Get-RandomID # 生成随机的身份证号

Get-RandomIdentity # 生成随机的身份信息

# 批量生成 20 个完整的身份信息
1..20 | % {
    Get-RandomIdentity
} | Out-GridView -Title 随机身份信息
输出结果:
孔懿
9903344437
7351437013@qq.com
15248325719
1950/02/24
男
450301200801030764


Name     : 方盼
QQ       : 8679192225
EMail    : 8679192225@qq.com
Mobile   : 13923186497
Birthday : 2005/11/09
Sex      : 男
ID       : 130101200511090819
以及文章开头显示的那个图形化列表。
另外如果您对如何提取区域代码感兴趣的话,还可以下载国标行政区划数据 GBT2260-1999.xml 和对应的解析程序 GBT2260.ps1 来研究。
Excel 的列号是采用“A”、“B”……“Z”、“AA”、“AB”……的方式编号。但是我们在自动化操作中,往往希望用数字作为列号。我们可以用 PowerShell 来实现 Excel 的列号和数字之间的互相转换。
Excel 列号 -> 数字
A   1
AB  28
AC  29
数字 -> Excel 列号
1   A
2   B
24  Y
26  Z
27  AA
28  AB
转换函数:
function ConvertFrom-ExcelColumn ($column) {
    $result = 0
    $ids = [System.Text.Encoding]::ASCII.GetBytes($column) | foreach {
        $result = $result * 26 + $_ - 64
    }
    return $result
}

function ConvertTo-ExcelColumn ($number) {
    $ids = while ($number -gt 0) {
        ($number - 1) % 26 + 1 + 64
        $number = [math]::Truncate(($number - 1) / 26)
    }

    [array]::Reverse($ids)
    return [System.Text.Encoding]::ASCII.GetString([array]$ids)
}
测试代码:
echo "A`t$(ConvertFrom-ExcelColumn A)"
echo "AB`t$(ConvertFrom-ExcelColumn AB)"
echo "AC`t$(ConvertFrom-ExcelColumn AC)"

echo ''

@(1..2) + @(25..28) | foreach {
    echo "$_`t$(ConvertTo-ExcelColumn $_)"
}
执行结果:
A   1
AB  28
AC  29

1   A
2   B
25  Y
26  Z
27  AA
28  AB
您也可以在这里下载完整的脚本。
我们常常需要查看 PATH 环境变量里是否有我们需要的路径。通常的做法是:
利用 PowerShell,可以告别以上笨拙的步骤:
PS > (type env:path) -split ';'
这样就可以看到一个完美分割过的列表了。当然,利用 PowerShell 强大的查询功能,还可以进一步节省眼力。例如我们要查询所有包含“_bin_”的路径:
PS > (type env:path) -split ';' | sls bin

C:\PROGRAM FILES (X86)\JAVA\JDK1.7.0_45\JRE\BIN
C:\PROGRAM FILES (X86)\INTEL\OPENCL SDK\2.0\BIN\X86
C:\PROGRAM FILES (X86)\INTEL\OPENCL SDK\2.0\BIN\X64
C:\PROGRAM FILES\MICROSOFT SQL SERVER\110\TOOLS\BINN\
D:\greensoft\UnxUtils\usr\local\wbin\
C:\Program Files\Microsoft SQL Server\120\Tools\Binn\
C:\Program Files\TortoiseGit\bin
C:\Chocolatey\bin
c:\Program Files\MongoDB 2.6 Standard\bin