PowerShell 技能连载 - 智能感知显示变量的技巧
在 PowerShell ISE 编辑器中,当您键入一个美元符号,将弹出一个智能感知菜单列出当前定义的所有变量。此时当您键入更多字符时,您不仅看见以这些字符开头的变量,而且还能看见在名字任意位置包含这些字符的变量。
要想只看到以您键入的字符开头的变量,请按下 ESC 键关闭智能感知菜单,然后按下 CTRL+SPACE 重新打开它。现在,它将只显示以您键入的字符开头的变量。
在 PowerShell ISE 编辑器中,当您键入一个美元符号,将弹出一个智能感知菜单列出当前定义的所有变量。此时当您键入更多字符时,您不仅看见以这些字符开头的变量,而且还能看见在名字任意位置包含这些字符的变量。
要想只看到以您键入的字符开头的变量,请按下 ESC 键关闭智能感知菜单,然后按下 CTRL+SPACE 重新打开它。现在,它将只显示以您键入的字符开头的变量。
我们常常需要在脚本运行时记录一些信息。如果将日志信息写入文本文件,那么您需要自己维护和管理它们。您还可以使用 Windows 自带的日志系统,并享受它带来的各种便利性。
要达到这个目的,您只需要初始化一个您自己的日志。这只需要由管理员操作一次。操作方法是以管理员身份启动 PowerShell,然后输入一行代码:

这样就好了。您现在有了一个可以记录“LogonScript”、“MaintenanceScript”和“Miscellaneous”事件源的日志文件。接下来,您可能只需再进行一些配置,告诉日志系统日志文件的最大容量,以及容量达到最大值的时候需要做什么操作即可:

现在,您新的日志文件最大可增长到 500MB,并且记录在被新记录覆盖之前可以保持 30 天。
您现在可以关闭您的特权窗口。写日志文件并不需要特殊的权限,并且可以从任何普通的脚本或登录脚本中写入日志。所以打开一个普通的 PowerShell 控制台,然后输入以下代码:

现在记录事件十分简单了,您可以根据需要选择任意的事件编号或消息。唯一的前提是只能写入已注册的事件源。
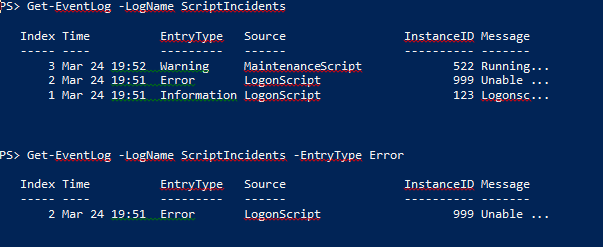
使用 Get-EventLog,您可以很方便地分析机器中的脚本问题:

所以,既然您可以方便地使用工业级强度的 Windows 日志系统,何须费劲地将信息记在纯文本文件中呢?
在上一个技巧中您学到了只有将 cmdlet 的 -ErrorAction 参数设为 "Stop",才可以用异常处理器捕获 cmdlet 的错误。但使用这种方式改变了 cmdlet 的行为。它将导致 cmdlet 发生第一个错误的时候停止执行。
请看下一个例子:它将在 windows 文件夹中递归地扫描 PowerShell 脚本。如果您希望捕获错误(例如存取受保护的子文件夹),这将无法工作:
try
{
  Get-ChildItem -Path $env:windir -Filter *.ps1 -Recurse -ErrorAction Stop
}
catch
{
  Write-Warning "Error: $_"
}
以上代码将捕获第一个错误,但 cmdlet 将会停止执行,并且不会继续扫描剩下的子文件夹。
如果您只是需要隐藏错误提示信息,但需要完整的执行结果,而且异常处理器不会捕获到任何东西:
try
{
  Get-ChildItem -Path $env:windir -Filter *.ps1 -Recurse -ErrorAction SilentlyContinue
}
catch
{
  Write-Warning "Error: $_"
}
所以如果您希望一个 cmdlet 运行时不会中断,并且任然能获取一个您有权限的文件夹的完整列表,那么请不要使用异常处理器。相反,使用 -ErrorVariable 并将错误信息静默地保存到一个变量中。
当该 cmdlet 执行结束时,您可以获取该变量的值并产生一个错误报告:
Get-ChildItem -Path $env:windir -Filter *.ps1 -Recurse -ErrorAction SilentlyContinue -ErrorVariable myErrors

Foreach ($incidence in $myErrors)
{
    Write-Warning ("Unable to access " + $incidence.CategoryInfo.TargetName)
}

非终止性错误是在 cmdlet 内部处理的错误。多数在 cmdlet 中产生的错误都是非终止性错误。
您无法用异常处理器来捕获这些错误。所以虽然在这个例子中有一个异常处理器,它也无法捕获 cmdlet 错误:
try
{
  Get-WmiObject -Class Win32_BIOS -ComputerName offlineIamafraid
}
catch
{
  Write-Warning "Oops, error: $_"
}
要捕获非终止性错误,您必须将它们转换为终止性错误。可以通过设置 -ErrorAction 参数为 "Stop" 来实现:
try
{
  Get-WmiObject -Class Win32_BIOS -ComputerName offlineIamafraid -ErrorAction Stop
}
catch
{
  Write-Warning "Oops, error: $_"
}
如果您不想一个一个为异常处理器中所有的 cmdlet 添加 -ErrorAction Stop 参数,您可以临时将 $ErrorActionPreference 变量设置为 "Stop"。该设置用于一个 cmdlet 没有显示地设置 -ErrorAction 的情况。
有时候,您会注意到虽然已经为 -ErrorAction 参数指定了 "SilentlyContinue" 值,cmdlet 还是会抛出错误。
-ErrorAction 参数只能隐藏非终止性错误(原本被 cmdlet 处理的错误)。不被 cmdlet 处理的错误称为“终止性错误”。这些错误通常是和安全相关的,并且不能被 -ErrorAction 屏蔽。
所以如果您是一个非管理员用户,虽然用 -ErrorAction 指定了屏蔽错误,以下调用将会抛出一个异常:

要屏蔽终止性错误,您必须使用异常处理器:
try
{
  Get-EventLog -LogName Security
}
catch
{}
最近,一个读者咨询如何从所有事件日志中获取全部事件,并且能将它们保存到文件中。
以下是一个可能的解决方案:
# calculate start time (one hour before now)
$Start = (Get-Date) - (New-Timespan -Hours 1)
$Computername = $env:COMPUTERNAME

# Getting all event logs
Get-EventLog -AsString -ComputerName $Computername |
  ForEach-Object {
    # write status info
    Write-Progress -Activity "Checking Eventlogs on \\$ComputerName" -Status $_

    # get event entries and add the name of the log this came from
    Get-EventLog -LogName $_ -EntryType Error, Warning -After $Start -ComputerName $ComputerName -ErrorAction SilentlyContinue |
      Add-Member NoteProperty EventLog $_ -PassThru

  } |
  # sort descending
  Sort-Object -Property TimeGenerated -Descending |
  # select the properties for the report
  Select-Object EventLog, TimeGenerated, EntryType, Source, Message |
  # output into grid view window
  Out-GridView -Title "All Errors & Warnings from \\$Computername"
在这个脚本的顶部,您可以设置希望查询的远程主机,以及希望获取的最近小时数。
接下来,这个脚本获取该机器上所有可用的日志文件,然后用一个循环来获取指定时间区间中的错误和警告记录。要想知道哪个事件是来自哪个日志文件,脚本还用 Add-Member 为日志记录添加了一个新的“EventLog”属性。
脚本的执行结果是在一个网格视图的窗口中显示一小时之内的所有错误和警告事件。如果将 Out-GridView 改为 Out-File 或 Export-Csv 将可以把信息保存到磁盘。
请注意远程操作需要 Administrator 特权。远程操作可能需要额外的安全设置。另外,请注意如果以非 Administrator 身份运行该代码,将会收到红色的错误提示信息(因为某些日志,比如说“安全”需要特殊的操作权限)。
如前一个技巧所述,用后台任务来同步运行任务往往效率不高。当后台任务返回的数据量增加时,它的执行性能变得更差。
一个更高效的办法是用进程内任务。它们在同一个 PowerShell 实例内部的不同线程中独立运行,所以不需要将返回值序列化。
以下是一个用 PowerShell 线程功能,运行两个后台线程和一个前台线程的例子。为了使任务真正长时间运行,我们为每个任务在业务代码之外使用了 Start-Sleep 命令:
$start = Get-Date

$task1 = { Start-Sleep -Seconds 4; Get-Service }
$task2 = { Start-Sleep -Seconds 5; Get-Service }
$task3 = { Start-Sleep -Seconds 3; Get-Service }

# run 2 in separate threads, 1 in the foreground
$thread1 = [PowerShell]::Create()
$job1 = $thread1.AddScript($task1).BeginInvoke()

$thread2 = [PowerShell]::Create()
$job2 = $thread2.AddScript($task2).BeginInvoke()

$result3 = Invoke-Command -ScriptBlock $task3

do { Start-Sleep -Milliseconds 100 } until ($job1.IsCompleted -and $job2.IsCompleted)

$result1 = $thread1.EndInvoke($job1)
$result2 = $thread2.EndInvoke($job2)

$thread1.Runspace.Close()
$thread1.Dispose()

$thread2.Runspace.Close()
$thread2.Dispose()

$end = Get-Date
Write-Host -ForegroundColor Red ($end - $start).TotalSeconds
如果依次执行这三个任务,分别执行 Start-Sleep 语句将至少消耗 12 秒。事实上该脚本只消耗 5 秒多一点。处理结果分别为 $result1,$result2 和 $result3。相对后台任务而言,返回大量数据基本不会造成时间消耗。
如果想提升一个脚本的执行速度,您也许会发现后台任务十分有用。它们适用于做大量并发处理的脚本。
PowerShell 是单线程的,一个时间只能处理一件事。使用后台任务时,后台会创建额外的 PowerShell 进程并且共享负荷。这只在任务彼此独立,并且后台任务不产生很多数据的情况下能很好地工作。从后台任务中发回数据是一个开销很大的过程,并且很有可能把节省出来的时间给消耗了,导致脚本执行起来反而更慢。
以下是三个可以并发执行的任务:
$start = Get-Date

# get all hotfixes
$task1 = { Get-Hotfix }

# get all scripts in your profile
$task2 = { Get-Service | Where-Object Status -eq Running }

# parse log file
$task3 = { Get-Content -Path $env:windir\windowsupdate.log | Where-Object { $_ -like '*successfully installed*' } }

# run 2 tasks in the background, and 1 in the foreground task
$job1 =  Start-Job -ScriptBlock $task1
$job2 =  Start-Job -ScriptBlock $task2
$result3 = Invoke-Command -ScriptBlock $task3

# wait for the remaining tasks to complete (if not done yet)
$null = Wait-Job -Job $job1, $job2

# now they are done, get the results
$result1 = Receive-Job -Job $job1
$result2 = Receive-Job -Job $job2

# discard the jobs
Remove-Job -Job $job1, $job2

$end = Get-Date
Write-Host -ForegroundColor Red ($end - $start).TotalSeconds
在一个测试环境中,执行所有三个任务消耗 5.9 秒。三个任务的结果分别保存到 $result1,$result2,$result3。
我们测试一下三个任务在前台顺序执行所消耗的时间:
$start = Get-Date

# get all hotfixes
$task1 = { Get-Hotfix }

# get all scripts in your profile
$task2 = { Get-Service | Where-Object Status -eq Running }

# parse log file
$task3 = { Get-Content -Path $env:windir\windowsupdate.log | Where-Object { $_ -like '*successfully installed*' } }

# run them all in the foreground:
$result1 = Invoke-Command -ScriptBlock $task1
$result2 = Invoke-Command -ScriptBlock $task2
$result3 = Invoke-Command -ScriptBlock $task3

$end = Get-Date
Write-Host -ForegroundColor Red ($end - $start).TotalSeconds
这段代码仅仅执行了 5.05 秒。所以后台任务只对于长期运行并且各自占用差不多时间的任务比较有效。由于这三个测试任务返回了大量的数据,所以并发执行带来的好处差不多被将执行结果序列化并传回前台进程的过程给抵消掉了。
Active Directory 内部使用 tick (从 1601 年起的百纳秒数)来表示日期和时间。在以前,要将这个大数字转换为人类可读的日期和时间是很困难的。以下是一个很简单的办法:
[DateTime]::FromFileTime(635312826377934727)
类似地,要将一个日期转换为 tick 数,使用以下方法:

如果您想记录脚本的运行时间,您可以使用 Measure-Command,但是这个 cmdlet 仅适合诊断目的,并且没有计算输出时间。
另一种方法是创建两个快照,并且在结束时计算时间差。
这段代码将告诉您 Get-Hotfix cmdlet 的执行时间,包括输出数据的时间:
$start = Get-Date

Get-HotFix

$end = Get-Date
Write-Host -ForegroundColor Red ('Total Runtime: ' + ($end - $start).TotalSeconds)