有一个十分有用的控制台程序叫做 quser.exe 可以告诉您哪些用户登录到了一台机器上。该可执行程序返回的是纯文本,但通过一点点正则表达式,该文本可以转换成 CSV 并导入 PowerShell。
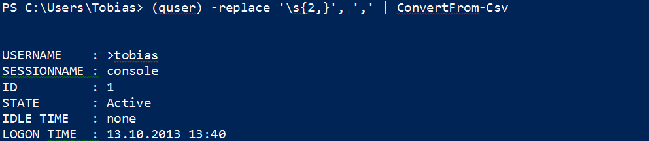
以下代码以对象的形式返回所有当前登录到您机器上的用户信息:
(quser) -replace 's{2,}', ',' | ConvertFrom-Csv
有一个十分有用的控制台程序叫做 quser.exe 可以告诉您哪些用户登录到了一台机器上。该可执行程序返回的是纯文本,但通过一点点正则表达式,该文本可以转换成 CSV 并导入 PowerShell。
以下代码以对象的形式返回所有当前登录到您机器上的用户信息:
(quser) -replace 's{2,}', ',' | ConvertFrom-Csv
只要有人使用错误的凭据登录,就会在安全日志中产生一条日志记录。以下是一个可以从安全日志中读取这些事件的函数(需要管理员特权)。它能够列出所有日志中非法的登录信息:
# requires Admin privileges!
function Get-LogonFailure
{
      param($ComputerName)
      try
      {
          Get-EventLog -LogName security -EntryType FailureAudit -InstanceId 4625 -ErrorAction Stop @PSBoundParameters |
                  ForEach-Object {
                    $domain, $user = $_.ReplacementStrings[5,6]
                    $time = $_.TimeGenerated
                    "Logon Failure: $domain\$user at $time"
                }
      }
      catch
      {
            if ($_.CategoryInfo.Category -eq 'ObjectNotFound')
            {
                  Write-Host "No logon failures found." -ForegroundColor Green
            }
            else
            {
                  Write-Warning "Error occured: $_"
            }

      }

}
请注意这个函数还可以在远程主机上运行。请使用 -ComputerName 参数来查询一台远程主机。远程主机需要运行 RemoteRegistry 服务,并且您需要在目标机器上的本地管理员权限。
以下是 PowerShell 配置(profile)的相关文章:
以下是 PowerShell 自动加载模块的相关文章:
非会员 QQ,在对话窗口的右上角会显示一个广告横幅,如图所示:
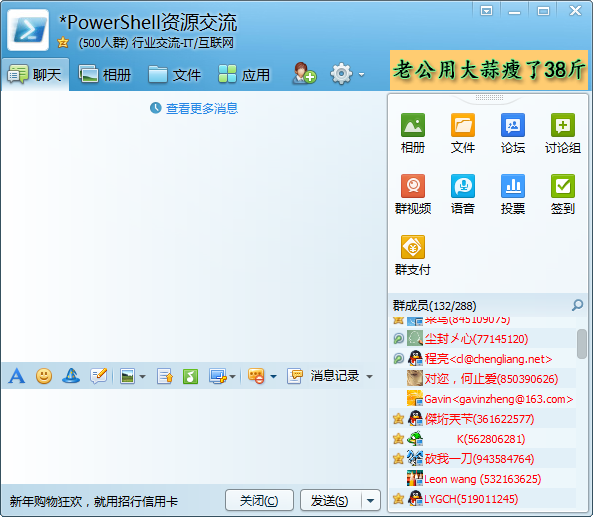
我们可以将 %appdata%\Tencent\Users\QQ号\QQ\Misc.db 文件删除并且替换成一个同名文件夹,就可以屏蔽该广告:
如果您有多个 QQ 号的话,我们可以用 PowerShell 来批量完成该任务:
echo '本脚本用于屏蔽 QQ 对话窗口右上方的广告条。'
Read-Host '请关闭所有 QQ,按回车键继续' | Out-Null

$usersDir = "$($env:AppData)\Tencent\Users\"
dir $usersDir -Directory | foreach {
    $qq = $_
    $qqDir = Join-Path $_.FullName 'QQ'
    $miscDb = Join-Path $qqDir Misc.db
    if (Test-Path -PathType Leaf $miscDb) {
        echo "正在禁用 $qq 的广告"
        del $miscDb
        md $miscDb | Out-Null
    }
}
exit
echo '处理完毕。'
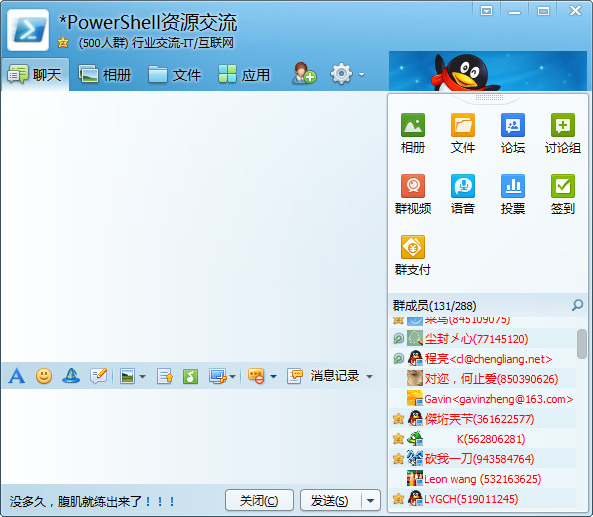
您也可以从这里 下载 写好的脚本,祝您使用愉快。
本方法在 QQ2013(SP6) 上验证通过。
我们可以对 Get-Alias 的结果进行分组和排序,看看常用的别名有哪些。
gal | group Definition | sort Count -Descending
执行结果:
Count Name                      Group
----- ----                      -----
    6 Remove-Item               {del, erase, rd, ri...}
    3 Move-Item                 {mi, move, mv}
    3 Invoke-WebRequest         {curl, iwr, wget}
    3 Copy-Item                 {copy, cp, cpi}
    3 Get-ChildItem             {dir, gci, ls}
    3 Set-Location              {cd, chdir, sl}
    3 Get-Content               {cat, gc, type}
    3 Get-History               {ghy, h, history}
    2 Start-Process             {saps, start}
    2 ForEach-Object            { %, foreach}
    2 Get-Location              {gl, pwd}
    2 Invoke-History            {ihy, r}
    2 Rename-Item               {ren, rni}
    2 Get-Process               {gps, ps}
    2 Write-Output              {echo, write}
    2 Set-Variable              {set, sv}
    2 Clear-Host                {clear, cls}
    2 Stop-Process              {kill, spps}
    2 New-PSDrive               {mount, ndr}
    2 Compare-Object            {compare, diff}
    2 Where-Object              {?, where}
    1 Receive-Job               {rcjb}
    1 Receive-PSSession         {rcsn}
    1 Measure-Object            {measure}
    1 Remove-PSBreakpoint       {rbp}
    1 Remove-PSDrive            {rdr}
    1 mkdir                     {md}
...
还可以用如下命令查看只有 1 个字母的别名(肯定最常用了):
gal | where { $_.Name.Length -eq 1 }

CommandType     Name                                               ModuleName
-----------     ----                                               ----------
Alias           % -> ForEach-Object
Alias           ? -> Where-Object
Alias           h -> Get-History
Alias           r -> Invoke-History
PowerShell 可以通过调用 Windows API,实现更改当前桌面背景并且立即生效。以下函数实现立刻更换桌面背景:
function Set-Wallpaper
{
    param(
        [Parameter(Mandatory=$true)]
        $Path,

        [ValidateSet('Center', 'Stretch')]
        $Style = 'Stretch'
    )

    Add-Type @"
using System;
using System.Runtime.InteropServices;
using Microsoft.Win32;
namespace Wallpaper
{
public enum Style : int
{
Center, Stretch
}
public class Setter {
public const int SetDesktopWallpaper = 20;
public const int UpdateIniFile = 0x01;
public const int SendWinIniChange = 0x02;
[DllImport("user32.dll", SetLastError = true, CharSet = CharSet.Auto)]
private static extern int SystemParametersInfo (int uAction, int uParam, string lpvParam, int fuWinIni);
public static void SetWallpaper ( string path, Wallpaper.Style style ) {
SystemParametersInfo( SetDesktopWallpaper, 0, path, UpdateIniFile | SendWinIniChange );
RegistryKey key = Registry.CurrentUser.OpenSubKey("Control Panel\\Desktop", true);
switch( style )
{
case Style.Stretch :
key.SetValue(@"WallpaperStyle", "2") ;
key.SetValue(@"TileWallpaper", "0") ;
break;
case Style.Center :
key.SetValue(@"WallpaperStyle", "1") ;
key.SetValue(@"TileWallpaper", "0") ;
break;
}
key.Close();
}
}
}
"@

    [Wallpaper.Setter]::SetWallpaper( $Path, $Style )
}

Set-Wallpaper -Path 'C:\Windows\Web\Wallpaper\Characters\img24.jpg'
PowerShell 技能连载 - 在 ISE 编辑器中使用块注释
在 PowerShell 3.0 中,引入了一个小技巧,可以整块注释/取消注释某一段代码。
在 ISE 编辑器中,单击插入点(比如说一段代码的开头)。然后,按住 SHIFT+ALT,然后按下 ↓键。
这时在 ISE 编辑器中将显示一条细细的绿线。当您高亮选中了这个块以后,在绿线消失前,按下 #(或任何您打算放在标记的行前的字符)。类似地,您也可以整块删除字符。
在上一个技巧当中您已学到如何用 systeminfo.exe 获取丰富的系统资料。systeminfo.exe 内置了远程的功能,所以如果您拥有了适当的权限,您可以获取远程主机的系统信息。
以下是一个简单的函数:
function Get-SystemInfo
{
  param($ComputerName = $env:ComputerName)

      $header = 'Hostname','OSName','OSVersion','OSManufacturer','OSConfig','Buildtype',`'RegisteredOwner','RegisteredOrganization','ProductID','InstallDate','StartTime','Manufacturer',`'Model','Type','Processor','BIOSVersion','WindowsFolder','SystemFolder','StartDevice','Culture',`'UICulture','TimeZone','PhysicalMemory','AvailablePhysicalMemory','MaxVirtualMemory',`'AvailableVirtualMemory','UsedVirtualMemory','PagingFile','Domain','LogonServer','Hotfix',`'NetworkAdapter'
      systeminfo.exe /FO CSV /S $ComputerName |
            Select-Object -Skip 1 |
            ConvertFrom-CSV -Header $header
}
以下是简单的调用示例:

PowerShell 和现有的控制台程序可以很好地共存。一个最有用的是 systeminfo.exe,它可以收集各种有用的系统信息。通过导入 systeminfo.exe 提供的 CSV 信息,PowerShell 可以将文本信息转化为对象:
$header = 'Hostname','OSName','OSVersion','OSManufacturer','OSConfig','Buildtype',`'RegisteredOwner','RegisteredOrganization','ProductID','InstallDate','StartTime','Manufacturer',`'Model','Type','Processor','BIOSVersion','WindowsFolder','SystemFolder','StartDevice','Culture',`'UICulture','TimeZone','PhysicalMemory','AvailablePhysicalMemory','MaxVirtualMemory',`'AvailableVirtualMemory','UsedVirtualMemory','PagingFile','Domain','LogonServer','Hotfix',`'NetworkAdapter'

systeminfo.exe /FO CSV |   Select-Object -Skip 1 |   ConvertFrom-CSV -Header $header
当您运行这段代码时,它将停顿数秒钟,以供 systeminfo.exe 收集信息。然后,您将会获得大量的信息:

请注意 $header:这个变量定义了属性名称,并且用自定义的列表替换了缺省的表头。所以,无论操作系统是哪种语言的,这些表头永远是相同的。
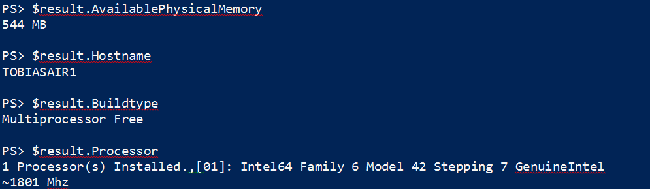
您还可以将这些信息存储在一个变量中,然后分别存取其中的信息:
$header = 'Hostname','OSName','OSVersion','OSManufacturer','OSConfig','Buildtype',`'RegisteredOwner','RegisteredOrganization','ProductID','InstallDate','StartTime','Manufacturer',`'Model','Type','Processor','BIOSVersion','WindowsFolder','SystemFolder','StartDevice','Culture',`'UICulture','TimeZone','PhysicalMemory','AvailablePhysicalMemory','MaxVirtualMemory',`'AvailableVirtualMemory','UsedVirtualMemory','PagingFile','Domain','LogonServer','Hotfix',`'NetworkAdapter'

$result = systeminfo.exe /FO CSV |
  Select-Object -Skip 1 |
  ConvertFrom-CSV -Header $header
由于 Start-Service 命令没有 -ComputerName 参数,所以您无法简单地远程启动一个服务。然而您可以在一个 PowerShell 远程管理会话中运行 Start-Service 命令。在某些场景下,一个更简单的方法是使用 Set-Service 命令。以下代码可以在名为 Server12 的服务器上远程启动 Spooler 服务:
Set-Service -Name Spooler -Status Running -ComputerName Server12
不幸的是,这个命令没有 -Force 开关。所以虽然您可以简单地启动服务,但您可能无法用这种方式停止它们。当一个服务依赖于另一个服务时,它必须使用“强制”的方式来停止。
